Cherry Cream Doughnuts

Buns and Breads

Hey Joe, doughnuts!!

But first, I’ve been thinking about shoes lately.

I attach a lot of my identity to the shoes I choose to buy and wear. I think you do to. It feels like something we quietly pride ourselves on. You helped me choose my first pair of Nike air max 90s. They were black and I accidently left them on a train home from Glasgow. I felt shy at school when all the other girls were wearing pretty boots, converse or vans while I was wearing my pink and white Puma Fast Riders. I remember looking down at my feet and feeling silly. Shame, If only I knew then that people would think I was really cool if I cut about in them at the age of 22.

Just have a think about wellies for a second – big old tubes of plastic. Lace up boots – long thin ankle holders attached to elongated rubber pancakes. The toe end of Reebok Classic Leather trainers are modelled on the Grinch’s curly toe feet and Sue’s slippers could be mistaken for 2 un-sliced Warburtons loafs.

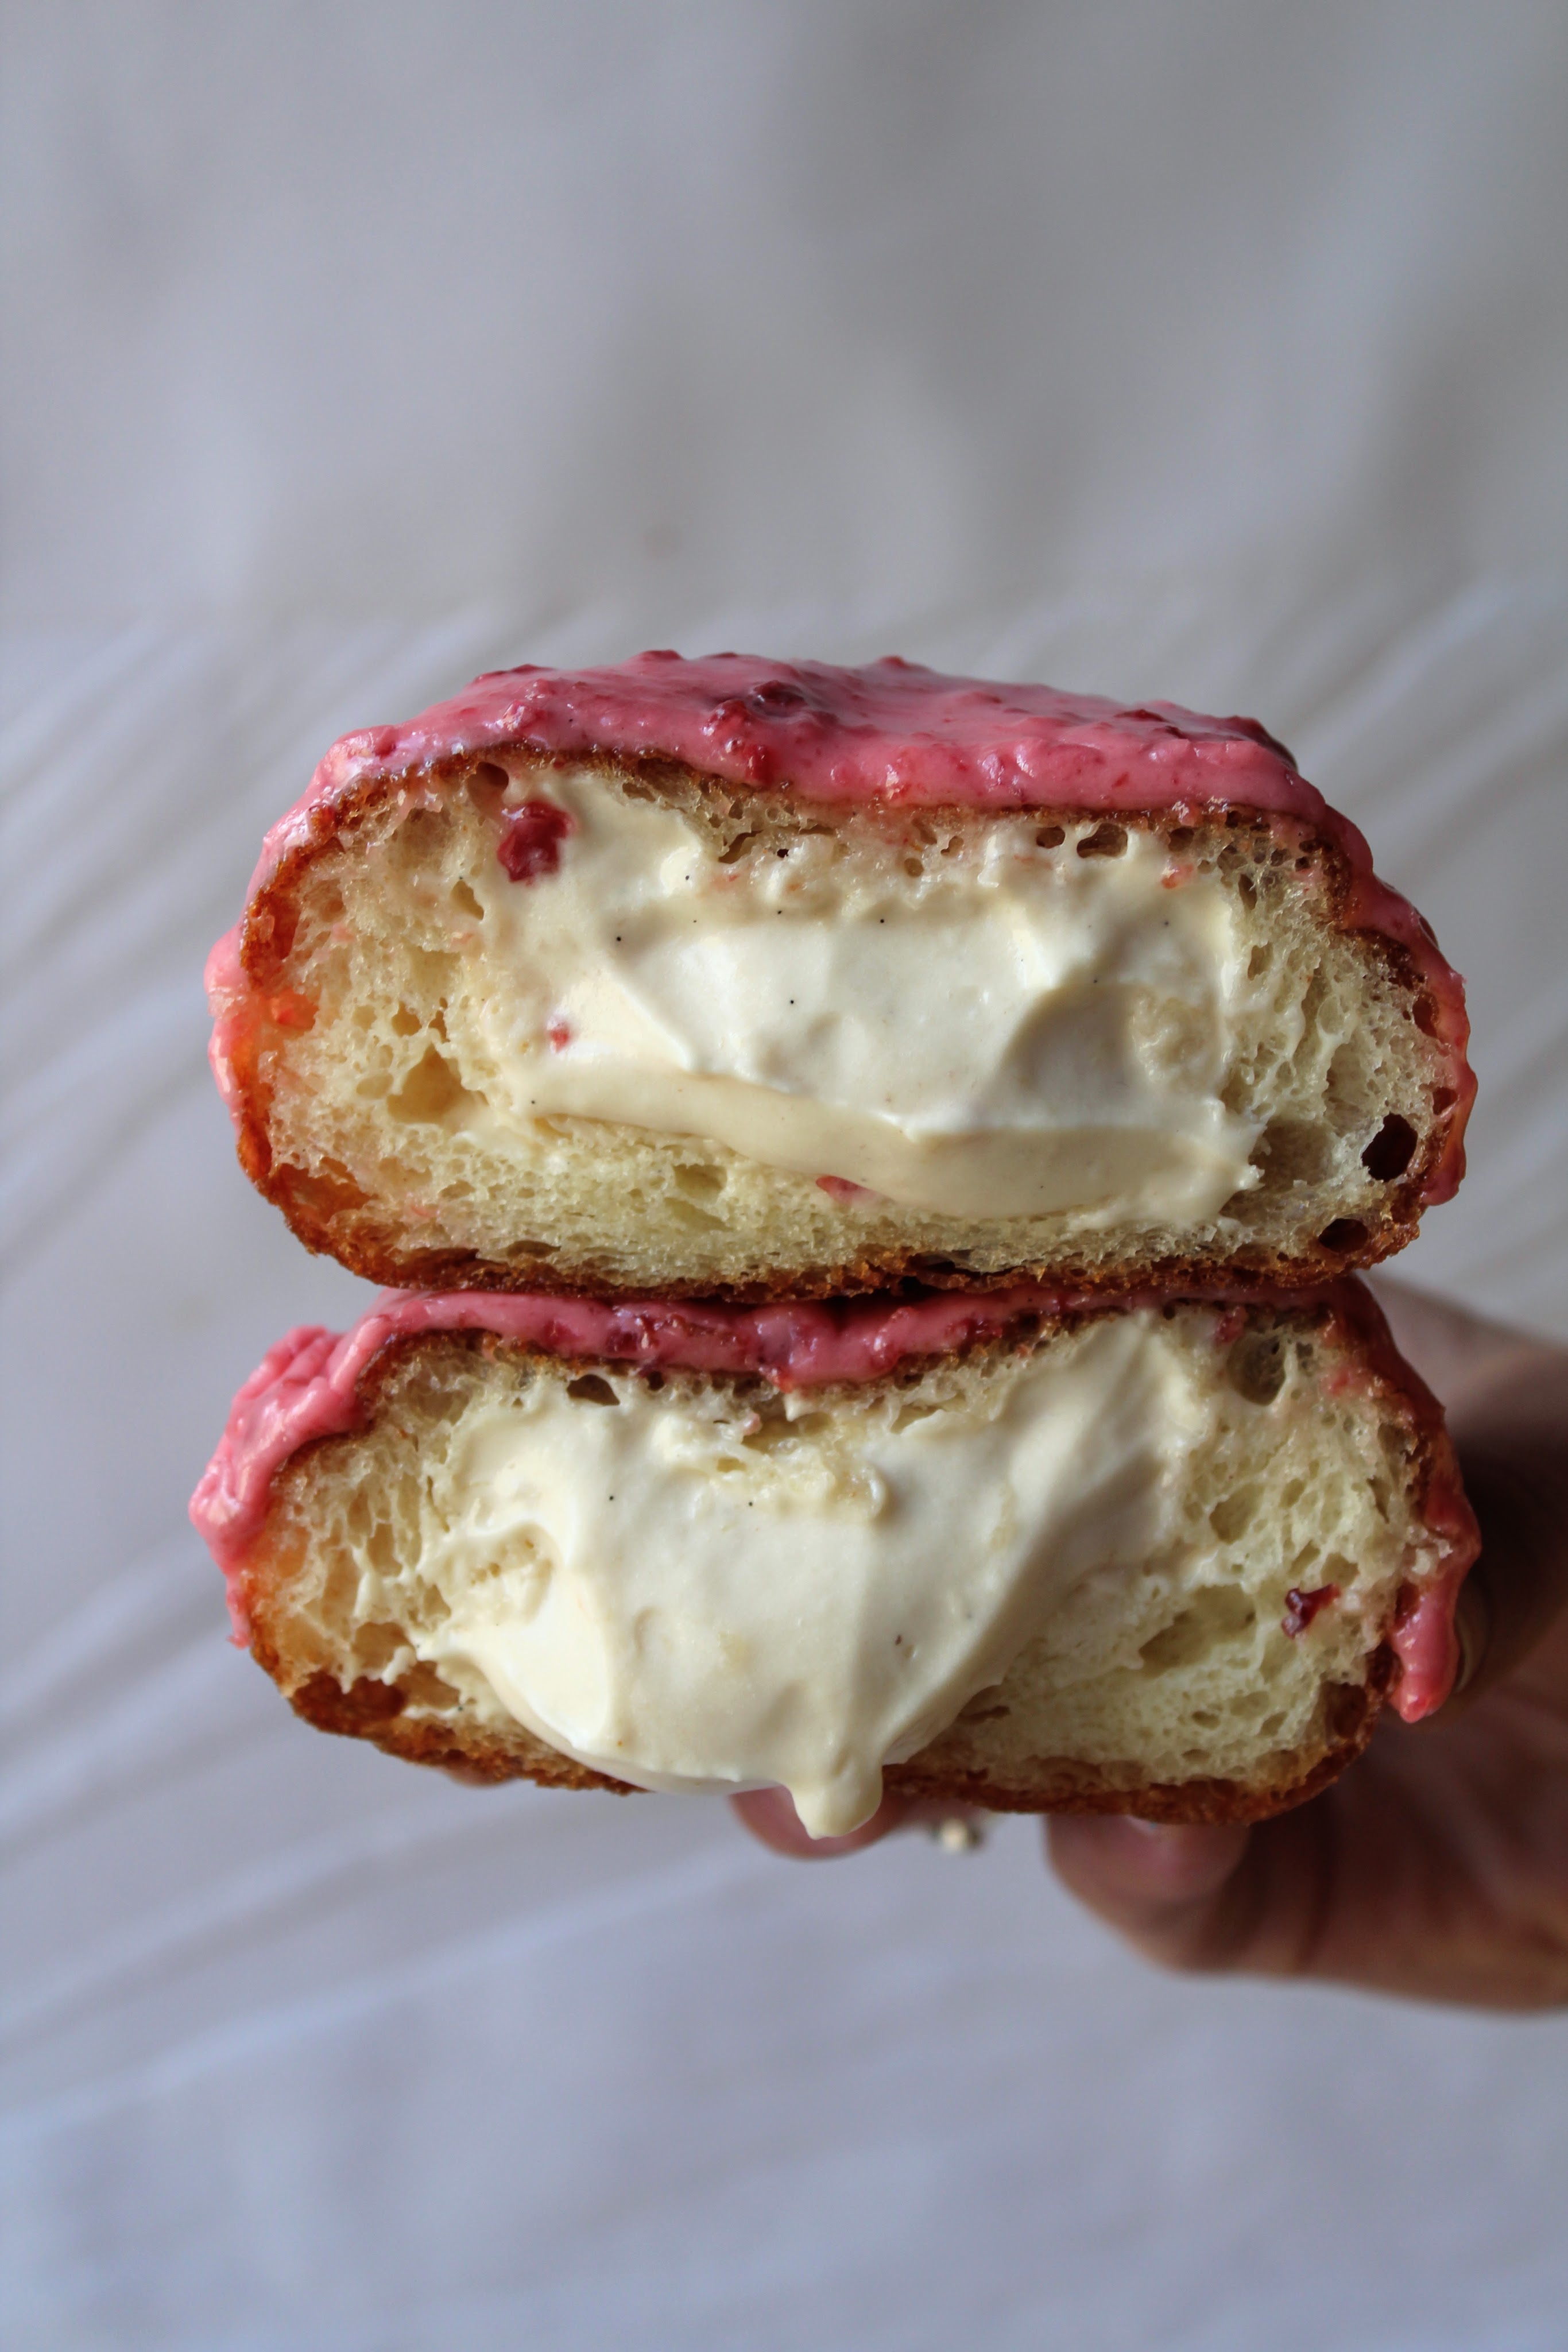
I like the idea of a shoe in the shape of a doughnut. French people call their apple turnovers ‘apple slippers’, chausson aux pommes. This makes a lot of sense to me. I’d love to have apple turnovers on my feet. These doughnuts are a bit like slippers too. They are soft on the inside with plenty of airy pockets to slip your feet into. The crispy exterior would protect your toes from hard things and the sharp cherry jam glaze gives you a bit of fashion jazz. I don’t fill these doughnuts with feet though, as comfy as it would be, I fill them with a beautifully light cherry custard cream. I called the filling a ‘crémeux’ when I presented them to the girls in the flat because I used the word once and they got a bit obsessed with it. It means ‘creamy’ in French and describes this filling well. The base of the filling is a crème pâtissière, thick vanilla custard, which is folded through cream whipped to soft peaks. It feels rich and almost buttery but it’s light as a feather. I fold a bit of cherry jam through the custard cream which leaves a perfect sweet cherry taste after the creaminess has melted away.

Honestly, I’d be surprised if anyone actually follows this recipe, not that I wouldn’t love it if someone wants to – work away and power to you!! – but this is more for me to remember what I did and maybe for others to get a bit of inspiration. I’m sure the measurements are not perfect, they could be refined and tested many more times, but it’s as close to perfect as it is right now. The cream is also too special not to write down, you could chuck in any fruit jam which I find pretty exciting.

Jam Note – Make this the day before you want doughnuts, there is enough going on with dough frying to be making jam as well. I’ve included a quick recipe here for cherry jam which makes the exact amount you need for the recipe. This is a spenny use of jam, the amount of fruit you use will cost about £2.50. If you are tight on money or time, find the cheapest jam you can get at the supermarket.

Crème Patissiere Note – You make this thickened custard the day before you want doughnuts, so it has time to set. When ready to fill the doughnuts, you fold in the cream and jam. 

Dough Note – The recipe for this doughnut dough is by Tessa from Now-Forager.com. I’ve made doughnuts quite a few times now and this is the best recipe I have used by far. It is also the fastest to put together. This is a soft dough; you will need a stand mixer to knead it.

Ingredients

Makes 7 Doughnuts. The ingredients list makes this recipe look much more complicated than it is. There are a few steps but individually each one isn’t complicated.

For the Quick Cherry Jam

  • 250g cherries – cut into halves, pitted and with stalks removed
  • 125g sugar

For the Crème Pâtissièremakes 400g

  • 250ml milk – whole or semi skimmed
  • 50g sugar
  • 1 vanilla bean or 3/4 teaspoon vanilla bean paste – 1 teaspoon vanilla extract will do perfect too
  • 50g egg – about 1 egg
  • 13g cornflour
  • 12g plain flour
  • 25g butter – at room temperature

For the Doughnut Dough

  • 170g milk – whole or semi skimmed
  • 1 medium egg
  • 50g plain flour
  • 215g strong white bread flour
  • 29g sugar
  • 6g fast action dried yeast
  • 1 1/4 teaspoon salt
  • 42g butter – softened at room temperature
  • About 1L bottle of vegetable or sunflower oil for frying

For the Cherry Cream Filling

  • 400g crème pâtissière
  • 150g double cream
  • 2 heaped tablespoons cherry jam

For the Cherry Glaze

  • 2 tablespoons cherry jam – you can blend smooth with a blender, like I did, for a less bitty glaze.
  • 250g icing sugar
  • juice of one lime or lemon
  • 1 teaspoon vanilla extract
  • 1/2 teaspoon orange blossom extract – optional
  • 1/4 teaspoon salt
  • Water to get the desired consistency

Method

The day before making the doughnuts prep the cherry jam. Mix the cherries and sugar in a heavy bottom saucepan. Put the pan over a medium/low heat and mash the cherries slightly with a fork to help them release some juice. Let the mixture bubble for about 20 minutes, stirring frequently. When the jam is ready it should be glossy and thick enough coat the back of a spoon. Transfer the jam to a clean jar or bowl and allow to cool. Cover and keep in the fridge until you are ready to use it.

Next make the crème pâtissière. It needs time to set so get this going the same day you make the jam. In a small saucepan, add the milk, vanilla and half the sugar. Mix and set aside. Measure out the egg into a mixing bowl, place the bowl on top of a tea towel on your worksurface. Now heat the milk mixture over a low/medium heat. While the milk heats add the rest of the sugar, the corn flour and plain flour to the bowl of egg. Whisk the egg mixture to combine.

Once the milk has come to a simmer keep a close eye on it, you want to catch it just before it reaches a full boil. It will simmer a little and then swell up a centimetre, now take the pan off the heat and slowly pour the heated milk into the egg mixture, pouring with one hand and whisking with the other. When all the milk has been poured into the egg, the custard will be very liquid. Pour the whole thing (egg and milk mixture) back into the saucepan over a medium heat. Whisk continuously until the custard has thickened to a consistency just thicker than mayonnaise, this will happen quickly. Remove from the heat and allow to cool in the pan for a few mins before whisking in the butter a teaspoon at a time. The crème pâtissière should now be thick and glossy. Transfer to a clean bowl and press cling film directly over the surface of the crème pâtissière, this will prevent a skin forming over the custard as it cools. Store in the fridge until ready to use (no longer than 3 days).

The next day make the doughnut dough. Put all ingredients for the dough into the bowl of a stand mixer fitted with a dough hook. Mix the ingredients on low speed to combine, then increase the speed to medium and mix for 7 mins or until the dough is smooth, glossy and has come away from the sides of the bowl. This is a wet dough and will feel tacky. Transfer the dough to a lightly oiled bowl. Cover with cling film and let it rise until doubled in size (about 1 hour).

When the dough is almost doubled, fill a large heavy bottom saucepan halfway full with vegetable or sunflower oil. You need at least a 2-inch depth of oil for frying. Attach a sugar or deep fry thermometer to the side of the saucepan and heat the oil to 177C.

As the oil heats, prep for frying. Line one baking tray with greaseproof paper, you will use this to put the doughnuts on before frying, and another tray with kitchen towels or toilet paper (lol), you will put the doughnuts on this tray after they have been fried. Set both trays aside.

Tip out the doughnut dough onto a well-floured worksurface. Sprinkle some flour over the dough and your rolling pin before rolling the dough to 1/2 inch thick. Use a 3-inch round cutter to cut out 7 doughnuts. Place them on the greaseproof lined baking tray. Cover the tray loosely with cling film.

When the oil reaches 177C, use a slotted metal spoon to gently lower 2 doughnuts into the oil. Fry the doughnuts for 2 mins on each side until deep golden-brown. Remove from the oil with the slotted spoon and place on the kitchen towel lined tray. Allow the oil to come back to 177C and repeat the process until all doughnuts are fried. Allow the doughnuts to cool completely before filling (about 1 hour).

Make the cherry cream filling. Whisk the cream to soft peaks and set aside. Use a spoon to work the crème pâtissière back and forth to loosen it up a bit. Heat 2 tablespoons of cherry jam on the hob or in the microwave to loosen it. Gently fold the loosened crème pâtissière and cherry jam into the whipped cream. You can strain the cherry jam through a sieve if you do not want bits of cherry in the cream.

Pierce the side of each doughnut with a knife and wiggle it about to create a hollow space for the cream. Have a deep side baking tray ready for the filled doughnuts (they need to be kept upright so the cream doesn’t escape). Fill a piping bag or sandwich bag with the cherry cream and cut a small hole in the tip of the piping bag (or sandwich bag). This is a loose filling, don’t expect this piping to be a clean process, the only way to be here is a bit messy. Hold a doughnut like you would a glass, wedge the tip of the piping bag into the hole and slowly squeeze, pulling the bag out the hole as you feel it balloon with filling. Sit the filled doughnut hole-side-up until you are ready to glaze it. Repeat until all doughnuts are filled.

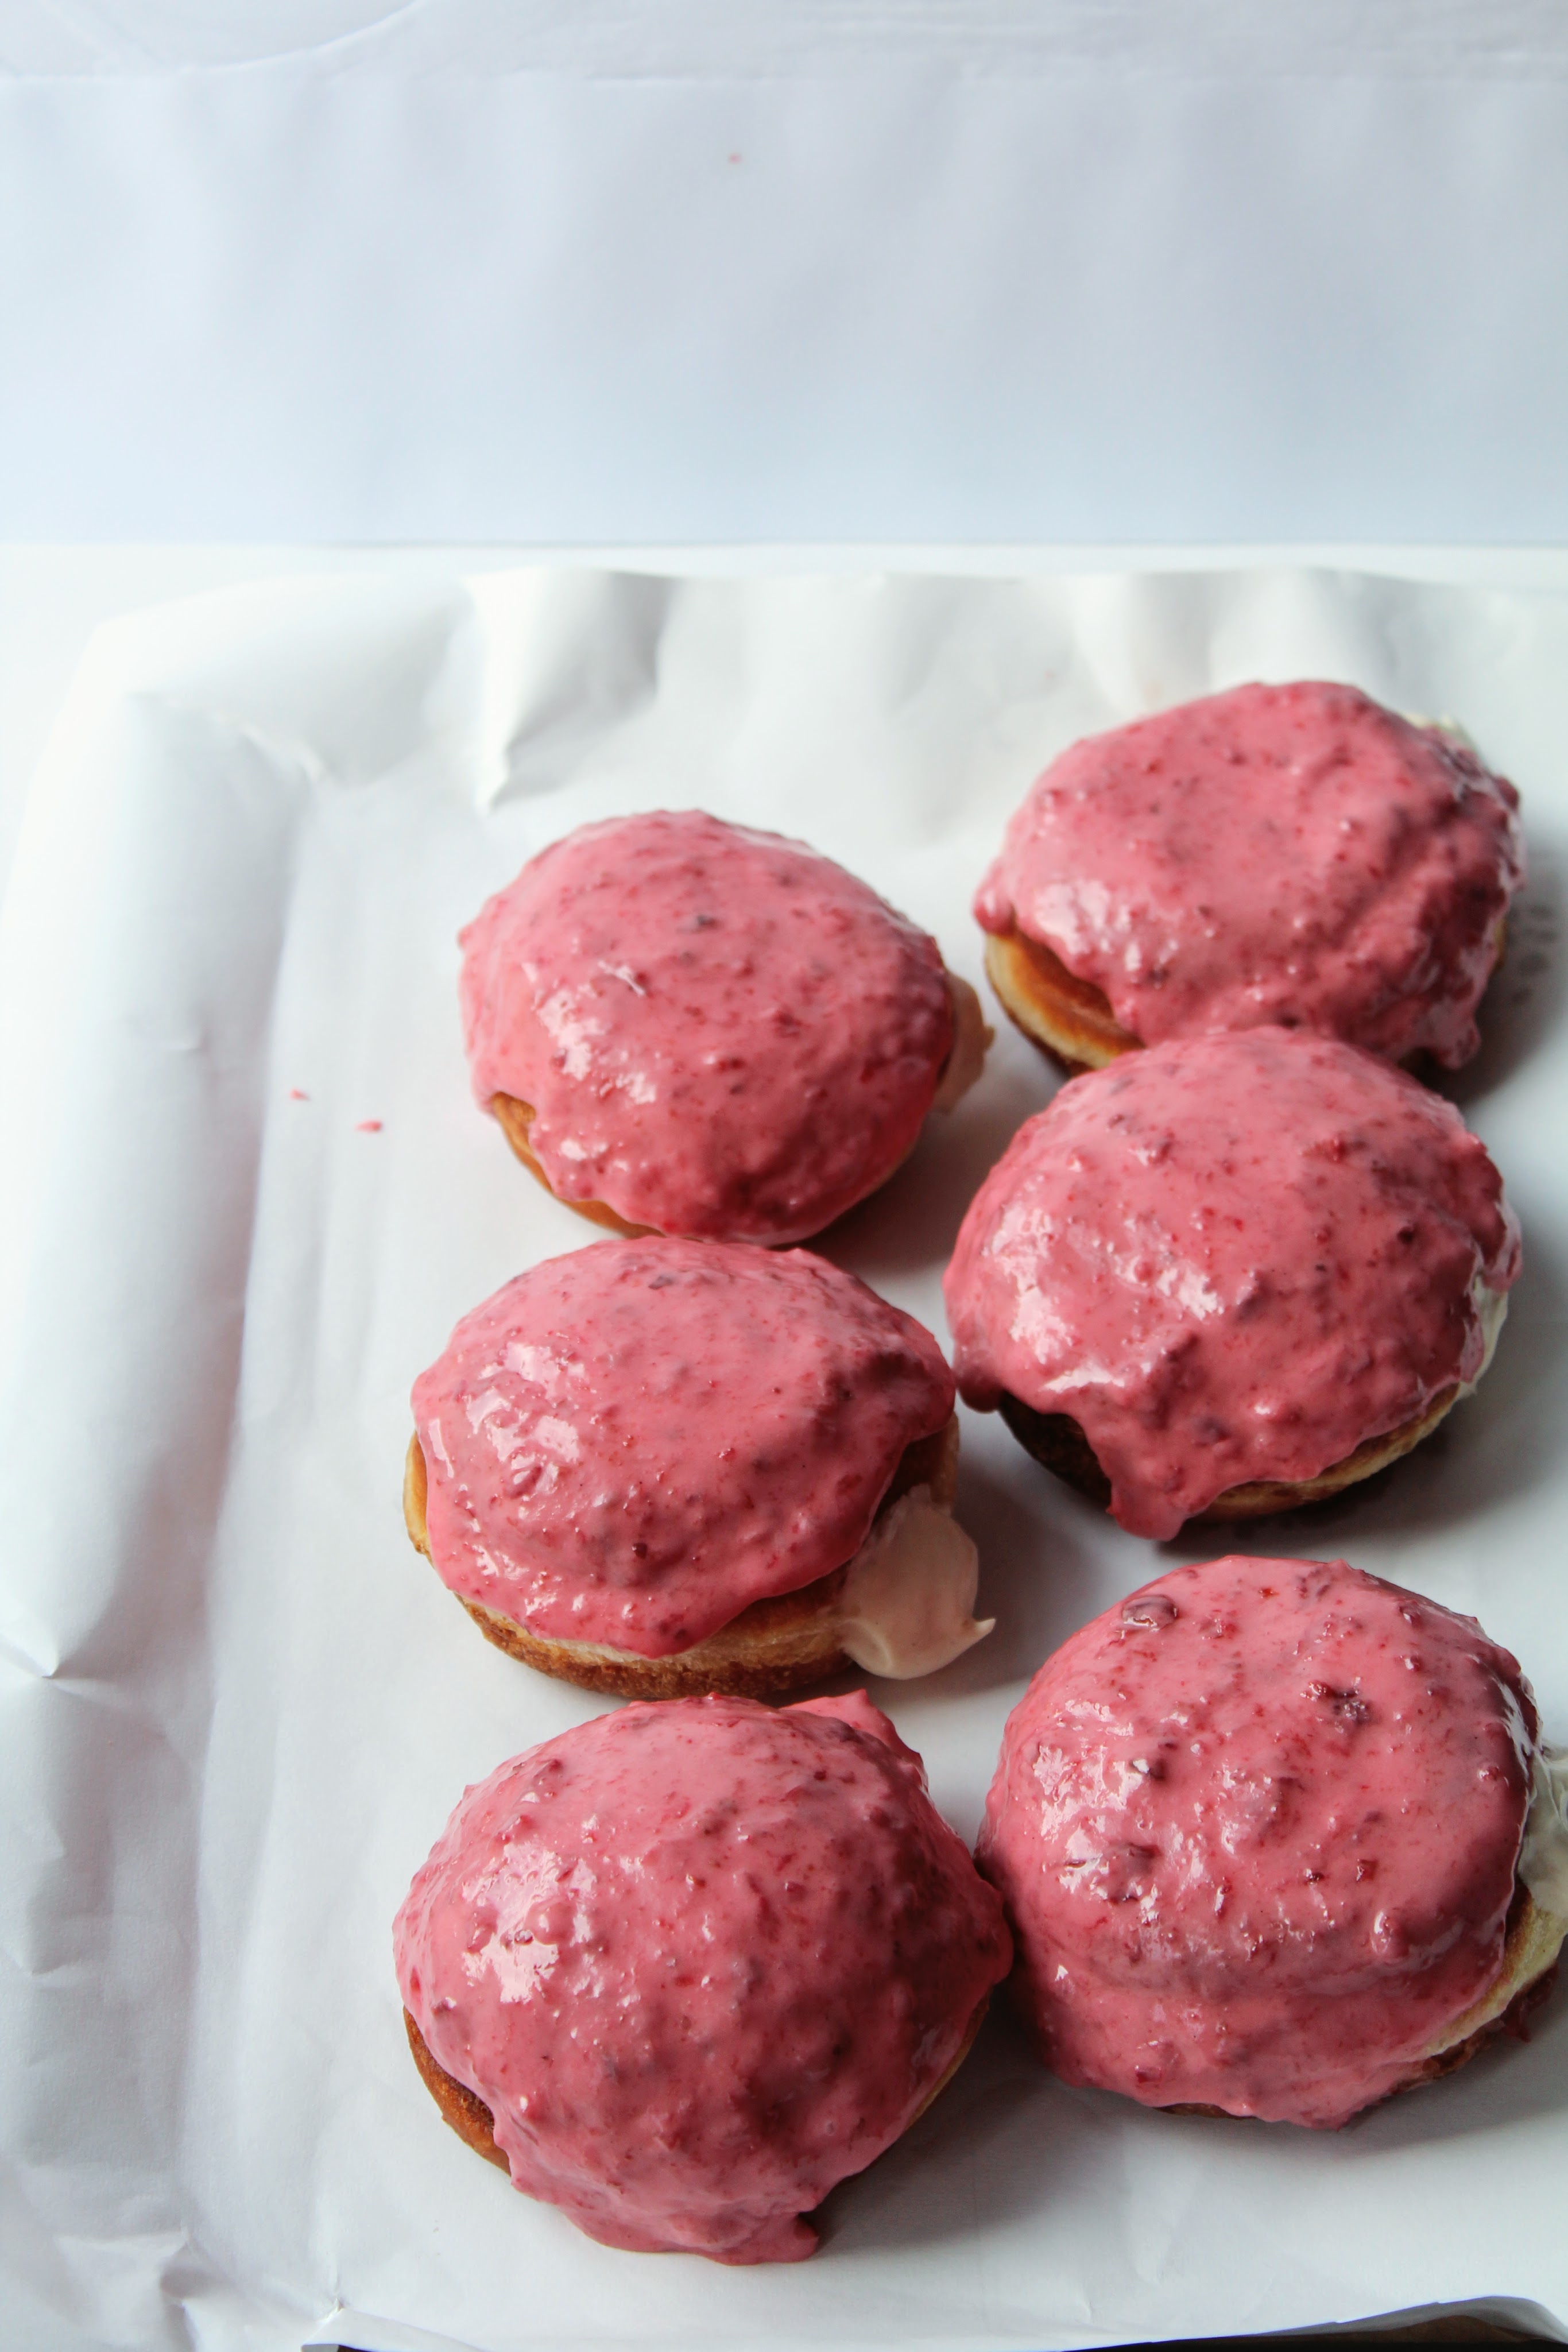
Make the cherry glaze. Put all ingredients for the glaze in a bowl, add a teaspoon of water and mix. Add a drop of water at a time until you reach the consistency you like. For icing like mine, you want a thick ribbon of glaze to fall slowly from a spoon pulled out of the glaze.

Dollop a spoon of the glaze on each doughnut, you can guide the glaze gently over the doughnut, so it drips down the sides. Place on a tray before eating lots of them, very quickly. Mmmmmm doughnuts.

haha this is me feelin shy in the school playground with my pink and white Pumas

Caitlin X

Vegan Spiced Carrot Cake

Cakes

Hello there Joe

This loaf has a crunchy sugar crust and a kinda caramel vibe to its soft inside, in its sweet stickiness. It’s the kind of stickiness that makes you want to eat one thick slice of this cake after another… and another, and then another. And then, it’s gone! Hmm. Oops. I really had no idea that a vegan cake could taste so good. A while ago, Beulah had sent me a photo of a carrot cake recipe scribbled on a notebook page that she had been given by a friend. I wanted to make her a surprise carrot cake using this recipe. I was asking her if she liked raisins in her carrot cake, before I chucked them in. Didn’t want her to be eating the surprise carrot cake, smiling but feeling sad that there were unwelcome raisins in her cake. The conversation went like this:

Caitlin: If you had a hypothetical carrot cake would you want it with or without raisins?

Beulah: I am an unhypothetical vegan. But I love raisins!

I worked on the un-vegan (non-vegan?) carrot cake recipe she sent me. What I ended up with was a beautiful beautifl lil vegan carrot cake that I’d take any day over one with eggs and butter.

Ingredients

  • 175g caster sugar
  • 250g plain flour
  • 1/2 teaspoon salt
  • 1 teaspoon bicarbonate of soda
  • 1/2 teaspoon baking powder
  • 1 1/2 teaspoon cinnamon
  • 1/2 teaspoon ground ginger
  • 3/4 teaspoon cardamom
  • 3/4 teaspoon nutmeg
  • 100g water
  • 100g vegetable oil
  • 50g golden syrup
  • 50g black treacle
  • 60g chopped walnuts – any nuts are good
  • 375g grated carrot – yes, 3 7 5 g
  • 60g raisins
  • 40g demerara sugar – to sprinkle over the top

Pre heat the oven to 190 / 170 fan. Grease and line a 1kg (2lb) loaf tin.

Grate the carrots and chop the nuts. Set them aside.

Combine sugar, flour, salt, bicarbonate of soda, baking powder and spices in a large bowl. Set this aside.

In a small saucepan, heat the oil, syrup and treacle. When the first bubbles appear, remove from the heat and pour into the dry ingredients. Add the water, carrots, nuts and raisins. Mix everything together until combined.

Pour into the loaf tin. Sprinkle the top of the unbaked loaf with the demerara sugar and bake for 55 mins or until a skewer inserted into the cake comes out with no wet batter on it.

Have a good carrot cake. Caitlin X

Double Chocolate Cookies

Uncategorized

Hey Joe

Happy Halloween bboooiii. Here are some monster cookies. You actually helped me make these yesterday haha but now you have the recipe written down. Thought all our followers needed the recipe too. (Ha! Mum, maybe tell a couple of your friends about this blog? I told mine, but they didn’t seem too interested…)

These are FAT chocolate chip cookies. They have a cookie/brownie/cake texture that is gooey and melts in the mouth. I put cornflour in these, the stuff you thicken gravy with, it gives the cookies the melt in the mouth ting – sounds strange, just trust me.

I made theses dairy free so Tiger can eat them. If you want the full dairy effect, swap the same amount of olive oil spread for unsalted butter.

Lil dudes!!

Ingredients

For about 15 cookies

  • 200g chocolate – I used a mixture, if you wanna add in another 100g of chocolate chunks, go for it.
  • 200g dairy free spread – I used olive oil spread. If using butter make sure its unsalted and softened.
  • 100g caster sugar
  • 150g light muscovado sugar – light brown sugar is all good too.
  • 1/2 teaspoon salt
  • 1/2 teaspoon vanilla extract – leave this out if you don’t have it.
  • 1 large egg
  • 200g self raising flour
  • 30g cornflour
  • 80g cocoa powder

Method

Chop up your chocolate into rough chunks. These don’t have to be neat, you want some bigger bits and some small. Set this aside.

Use a wooden spoon or electric beaters to cream the dairy free spread and sugar together until light and fluffy. Add in the egg, salt and vanilla extract and give it another good mix together. Don’t worry if the mixture has curdled at this point.

To the sugar mixture sift in the flours and cocoa powder then mix this in. Add the chocolate chunks and give the cookie dough a final mix.

Cover the bowl with clingfilm and put in the fridge for 20mins. Sounds annoying, but it means the cookies won’t melt and flatten out when they hit the heat of the oven. This means your less likely to burn the cookies and they will have a fatter (this a thing?) texture.

While the cookie dough chills pre heat the oven to 180. Line a couple baking trays with grease proof paper.

When the cookies are ready to be baked, spoon out the dough in small mounds, making sure to leave them a lil bit spaced apart on the tray. Use one heaped tablespoon amount of dough for each cookie, or you can use an icecream scoop. Bake these for 12-14 mins, they will be squashy when they come out the oven, this is what you want.

This guy is my fav guy. Seems like a Quentin to me.

Enjoy the cookies man and have a good Halloween. Caitlin xxxx

(I’m writing this on the train to Glasgow, the wifi is pretty shit and I have diarrhoea. Apart from that, my Halloween is going really well.)

Coffee Caramel Cake and Happy Birthday Máté

Uncategorized

Yo Joe,

I made this cake for my friend Mátés birthday the other week. OH MY GOD its really good. Máté said he likes anything with coffee and caramel so I combined the two in cake form. How inventive of me.

It’s a marbled sheet cake, one flavour of sponge is vanilla, the darker sponge is coffee and caramel. To top it off is a salted caramel buttercream. If I was making this cake for your birthday, I would get rid of the cake bit and stick candles in a thick layer of caramel buttercream. lol it’s very good. Here are some picture of buttercream for you to enjoy.

To get the caramel in the cake and buttercream I made a caramel sauce. Mmmm. Its surprisingly easy to make. You can mix it into buttercreams, cake batter, whack it on your tooth brush in the morning, use it to stick things to your head. Endless possibilities.

From this recipe you will get about 250ml of caramel sauce so you’ll have leftovers. You are welcome. This doesn’t have to be made on the day you make the cake, it can be made up to 3 days in advance.

Caramel sauce is my favourite kind of sauce

Ingredients

To fit in a square or rectangle baking tin. Mine is 20cm by 24cm. You can use whatever you have. Keep in mind depending on the size of your tin, you may need to adjust the baking time for your cake.

Caramel Sauce – Makes about 250ml. This will last in an airtight container in the fridge for up to three days.

  • 125g sugar
  • 50ml water
  • 100ml double cream
  • 30g unsalted butter
  • 1/2 teaspoon vanilla extract
  • Generous pinch of salt

Cake

  • 200g unsalted butter
  • 170g sugar
  • 3 eggs
  • 200g self-raising flour
  • Splash of milk
  • 3 teaspoons instant coffee granules
  • 2 tablespoons boiling water

Note on measurements – If you don’t have a measuring jug, 1 ml and 1 gram is roughly the same weight so you can measure any of the liquids in your weighing scales.

Note on coffee – I ask for instant coffee in the ingredients but any strong coffee will do. As long as you have 2 tablespoon worth of strong coffee to pour into the half the cake better all is well.

Salted Caramel Buttercream

I never weigh my ingredients for buttercream. I go by texture and taste. If you want some measurements to start off with here you go. (Go on Joe live outside the bubble and don’t use the measurements.)

  • 140g softened unsalted butter
  • 280g icing sugar
  • 1/2 teaspoon vanilla extract
  • Generous pinch of salt
  • 1 tablespoon caramel sauce

Method

Caramel Sauce

Measure out the cream and butter and set aside.

Put the sugar and water in a small heavy based saucepan. Over a medium heat stir the sugar until it has all dissolved into the water, the water will look a bit cloudy. Once the sugar has dissolved stop stirring! Now let the caramel do its thing.

Keep the sugar and water mixture heating over a medium heat, letting it bubble away until it has turned an light amber colour. This will take about 4/5 mins, but keep an eye on it, caramel can go from golden amber coloured to burnt very quickly. One rule for making caramel is not to stir the mixture as it is heating, this will crystallise the sugar. If you want to give the mixture a stir, you can swirl the sauce pan from the handle.

Once the caramel is a colour you are happy with remove it from the heat. Quickly pour the cream into the caramel in one go, it will bubble up, and start stirring the cream in immediately. Now stir in the butter, salt and vanilla extract. Once everything is incorporated you have made caramel sauce!

Here is a lil
bit of my art do

you like it?

Cake

For the cake pre heat the oven to 170. Grease and line the baking tin.

Make your coffee. I use 3 teaspoons of instant coffee and 2 tablespoons of boiling water. Set this aside for later. In a bowl cream together the butter and sugar until pale and fluffy. Weigh out your flour and set this aside.

Beat one egg at a time into the butter mix. Add a spoon of flour with each egg addition to stop the mixture curdling. Add the salt and vanilla extract and give all this a good mix.

Sift in the remaining flour and gently fold this into the cake batter. Separate the batter into two bowls. There should be about half the batter in each bowl.

In one half of the batter, add a splash of milk and mix this gently in, trying not to mix it too much. For the other half of batter gently mix in the 2 tablespoons of coffee and 2 tablespoons of caramel sauce.

Dollop the 2 cake batters in big blobs around the cake tin. Give the whole tin a bit of a shake from side to side to level out the top. Using a knife or skewer draw 2 figure of 8 patters through the cake batter. This will create the marble effect (this is my fav bit).

Bake for 30 mins or until a knife inserted into the cake comes out clean. Allow the cake to cool for 10 mins before taking it out of the tin.

Salted Caramel Buttercream

You can eat away now….or you can make the buttercream. Make sure you butter is nicely softened, you can give it a very short burst in the microwave to soften it a bit, just make sure not to melt the butter.

Using a wooden spoon or electric mixer beat your butter until pale and fluffy. Sift in the icing sugar, give it a gentle stir and then go back in the with electric whisk or give it a good mix with the wooden spoon.

Add in the vanilla extract, salt and caramel sauce. Beat the buttercream until light and fluffy. Once the cake is cooled SMUTHER it in the buttercream.

Have a good cake Joe and Happy Birthday Máté. Caitlin xxx